NOTE:

NOTE: Of late, I have been getting requests for very trivial problems that many of you are facing in your day-to-day work. This blog is not to solve your "project" problems - surely not a "Support" site.
I just love to share my knowledge in my spare time and would appreciate any questions or feedback on the articles and code I have shared. I also do appreciate thought-provoking questions that would lead me to write more articles and share.
But please do not put your day-to-day trivial problems here. Even if you do, you most probably would not get a response here.
Thanks

Search This Blog

x

Friday, 25 November 2011

Local WebServer – Apache Tomcat


Pre-requisites: You should have Apache Tomcat installed on your machine, downloadable from http://tomcat.apache.org/download-60.cgi  and you should have eclipse 3.6 on your machine
Configure the webserver to be used within eclipse as follows:

1.       Unzip the download into your local directory
2.       Tell Eclipse about Tomcat

First, start Eclipse and go to the Workbench as shown in the previous section. Then, click on Servers tab at bottom. R-click, New, Server, Apache, Tomcat v6.0, navigate to folder, OK. You should now see "Tomcat v6.0 Server at localhost" listed under the Servers tab at the bottom.

3. Run Tomcat.
Click on Servers tab at bottom. R-click on Tomcat v6.0, choose "Start". Open http://localhost/ in a browser: you should see an empty page showing a blank directory listing (but not a 404 error). Eclipse incorrectly fails to copy the welcome pages when it sets up Tomcat, so if you want the friendlier welcome page, go to your-eclipse-workspace\.metadata and search for "ROOT". Copy all of the files from C:\apache-tomcat-6.0.28\webapps\ROOT into the ROOT folder inside your-eclipse-workspace\.metadata\...\ROOT. 
If you fail to copy the ROOT files as mentioned above, http://localhost/ will result in an empty directory listing. It is often mistaken for an error page, but if you look closely you will see that it says "directory listing for /" and is not an error at all. However, if you copy the ROOT files, http://localhost/ will give the nice friendly "Welcome to Tomcat" page.
4.  Make empty project.
a.       File, New, Project, Web, Dynamic Web Project.
b.      Give it a name (e.g., "SampleWebServer").
c.       Accept all other defaults.

5. Make a Welcome.html and place it on the ‘WebContent’ folder of your new Dynamic Web App.
6. Now if you type http://localhost:8080/SampleWebServer/Welcome.html in your browser, you should be able to view the page. 


Basic WebView


On Android we can build what are called Hybrid Apps. i.e. apps that have both HTML pages as well as native activities co-existing. There is a lot of debate on which is the way to develop for mobiles – HTML5 or native? Each of these have their own pros and cons. I will not go into those now. However, to be able to embed HTML pages into your app, one of the ways is through the use of a WebVew component.
Here I will share with you a very simple example of building a WebView App. This is nothing too different from what you see in the google resources pages. However, the intention here is to move from this basic level to a little more advanced level of interacting from the HTML page with Native Apps – integrating through JavaScript. That will be in the next tutorial, in keeping with my principle of explaining one thing at a time.

Also, for this example you will also need to have a webserver that serves you some HTML pages that can be invoked through your WebView. As an addendum to this article, you will find how to create a small web server app in your local environment.

Now, what is a WebView? Google documentation beautifully explains it as
 “A View that displays web pages. This class is the basis upon which you can roll your own web browser or simply display some online content within your Activity. It uses the WebKit rendering engine to display web pages and includes methods to navigate forward and backward through a history, zoom in and out, perform text searches and more.”

Let’s create a WebView which should display your home Page, on loading. In the main class of the project here is the code in the onCreate() method:

  public void onCreate(Bundle savedInstanceState) {
        Log.i(TAG, "Entering onCreate");
        super.onCreate(savedInstanceState);
        setContentView(R.layout.webview);
       
        mWebView = (WebView)findViewById(R.id.webview);
        mWebView.clearCache(true);
        mWebView.getSettings().setJavaScriptEnabled(true);
       mWebView.loadUrl("http://10.0.2.2:8080/SampleWebServer/Welcome.html");
        Log.i(TAG,"Exiting onCreate");
}    

It is simple and straight forward. I have defined a WebView in the layout folder as below (file name webview.xml)

<LinearLayout xmlns:android="http://schemas.android.com/apk/res/android"
      android:layout_width="fill_parent"
      android:layout_height="fill_parent">
            <WebView
                android:id="@+id/webview"
                android:layout_width="fill_parent"
                android:layout_height="wrap_content"
                  android:scrollbarStyle="outsideOverlay"
                  android:scrollbarFadeDuration="5"
                  android:fillViewport="true"/>

</LinearLayout>

I get a handle to the WebView in this line: mWebView = (WebView)findViewById(R.id.webview);
And then I load the local URL in this line       mWebView.loadUrl("http://10.0.2.2:8080/SampleWebServer/Welcome.html");

As simple as this. What this does is that it invokes the default android browser if we have links on the welcome page as shown below: (we have gone out of the WebView into a browser app)
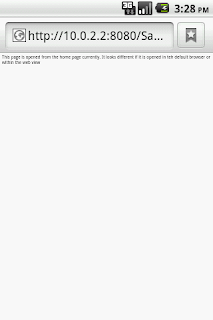
 

If we want to be able to continue opening in the WebView, here is the piece of code that would help. Basically we are writing out own custom browser by extending the WebViewClient:

  private class WebViewSampleClient extends WebViewClient {
       
        @Override
        public boolean shouldOverrideUrlLoading(WebView view, String url) {
            view.loadUrl(url);  
           
            return true;
        }
       
  }

Here we are telling to load the passed URL into the WebView by overriding the shoudlOverrideUrlLoading method of the WebViewClient.

After overriding the same, add another piece of code into onCreate() method:
mWebView.setWebViewClient(new WebViewSampleClient());
after mWebView.loadUrl("http://10.0.2.2:8080/SampleWebServer/Welcome.html");

Now when you click on the Second Page link, the new HTML page gets invoked within the WebView as shown below:


From here, if you press a back button, you will log out of the app, since WebView is one activity and the pages are all opened within the WebView. In order to override that behavior and you want to navigate back to the HomePage within the WebView.

    @Override
    public boolean onKeyDown(int keyCode, KeyEvent event) {
        if ((keyCode == KeyEvent.KEYCODE_BACK) && mWebView.canGoBack()) {
            mWebView.goBack();
            return true;
        }
        return super.onKeyDown(keyCode, event);
       
    }

The code is pretty self explanatory. When a back button is clicked and there is something within the WebView that we can go back it, do it within the WebView.  Here is the complete code for download.

Last but not the least, I have also added <uses-permission android:name="android.permission.INTERNET" /> into the AndroidManifest file as this app will use the internet to invoke the http based URL.

To create a Web Server and host HTML pages, please see this tutorial.

NOTE: any webserver running locally can be accessed through http protocol using the IP address 127.0.0.1 or localhost or the actual IP address which you get when you run IP address command at the command prompt. However, within the emulator, the linux kernel takes the localhost as 10.0.2.2. and hence you will see in the code above that this IP address is used.


Friday, 18 November 2011

Android - conversion to dalvik format failed with error 1

Hi,


I am sure many of you may see this error at sometime or the other when you are developing in Android o Eclipse. Most times, I have found this work for me.


In Eclipse, select the project causing the error- go to the menu project -> properties -> java build path -> libraries and remove all jars including the android jars. 


Then, right click the project, go to android tools -> fix project properties. Then, add back any other external jars you wanted to add to the build path following the same menu project -> properties -> java build path -> libraries. To ensure there are no errors due to missing libraries.


Then, do a 'clean' on menu project and build again. It should work.


My guess is that when an incompatible android jar is used to compile this error is thrown. There may be many other scenarios too that cause thsi error... you can add them below

Monday, 14 November 2011

Localhost Access in Android Emulator

This is a small tit-bit I discovered today:


If you want to access your localhost through the Android Emulator - you need to use the IP Address 10.0.2.2 unlike how we do on the web browsers on our desktops where we access the local host as 127.0.0.1 or 'localhost' itself.


This information is useful if for testing purposes you have locally installed a webserver and put a few HTML pages or if you have locally hosted web services - say REST Services that need to be invoked through a URL like this: http://localhost:8080/rest/hello, then, use the above mentioned IP address and you will be able to access your service or webpage through the emulator.


Or you could simple use your own IP address like 192.168.3.233 - whatever yours is. If you do a "ipconfig" in a windows command prompt, you will know what your IP address is. (one of the ways to find it out). However, there is one disadvantage with this method if your IP is allocated to you dynamically on your network. This will keep changing. In such a case, using 10.0.2.2 will be the equivalent of 127.0.0.1 which will not change for the localhost.


Hope this helps.